Wednesday, December 30, 2009

Outdoor Cat's Adventures Indoors

IMG_7856 Nuts & Outdoor Cat
When last I blogged about Outdoor Cat in May, she had just survived the Wisconsin Humane Society's Trap-Neuter-Return program. Over the summer, we worked on socializing with her and getting the two indoor cats Nuts & Ruby used to her presence. (That's Nuts on the left above, and OC on the right, each pretending the other cat doesn't exist.) OC started coming inside briefly after one day following me in the front door when I took her dish inside to change the water and refill the food. Pretty soon she figured out that the indoor cats ALSO had food and water! She would come inside to look around but would quickly run out again if she was startled.

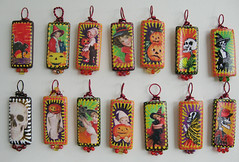
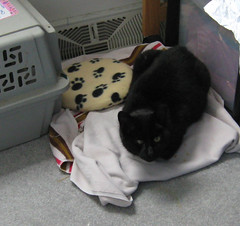
We still weren't sure whether we would try to bring her inside for the winter or not, but we figured we'd try to get her litter box trained in a kennel for the really cold nights, just in case. I borrowed a dog kennel from my sister and kept OC in it overnight in the spare bedroom for the first time on Halloween, when 200 neighborhood kids invaded her territory on our front porch.

She handled the litter box OK but was not keen on the kennel, trying to tunnel out of it. When we were sure she would use the box, we experimented with leaving the kennel door open. She still preferred to be outside, so when our first big snow was predicted, I invested in a SnuggleSafe Microwave Heat Pad for her shelter. However, after we brought her in out of the storm, she settled in to her new space in front of the heat vent.
IMG_8495x Outdoor Cat practices being indoors
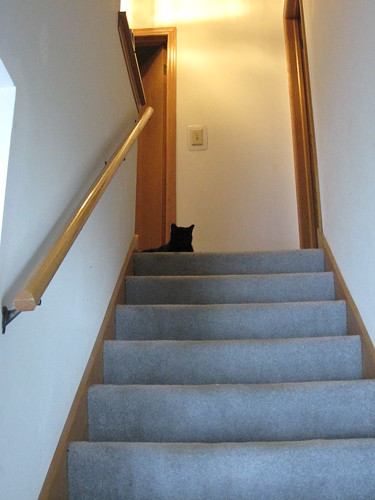
So she's been living indoors since mid-December, occasionally looking outside but thinking better of it after a minute or so in the cold. She's even trained us to leave her bedroom door open for her (after repeatedly waking us up at ungodly hours by scratching at it) and now she guards the upstairs hallway at night. Since Nuts sleeps on our bed, there are occasional rumbles in the wee hours when they cross paths in the hall. (Ruby sleeps all night in the living room and generally ignores OC.) We have been closing OC's bedroom door during the day when we're at work, so when we come home and let her out, she will sometimes run downstairs and ask to go outside, look out the front door at the snow and ice, and run back upstairs to her food dish. We are not ruled by cats, at all. Honestly!
IMG_8515 Outdoor Cat getting used to stairs

Thursday, December 17, 2009

Christmas is NEXT WEEK?!?

ZentangleChristmasTreeZentangle Wreath
Not that I'm panicking or anything! I have been working on little art projects here and there, but can't post photos until after the holidays. This coming weekend is our local ATC group's end of year party, so I made a few Christmas-ish ATCs such as this Zentangle tree & wreath inspired by Sandy Steen Bartholomew's article in Cloth Paper Scissors and the Tangles of the Week on her blog.

I did a bunch of holiday crafting in November because Lisa Vollrath gave the Ten Two Studios Design Team a challenge to come up with projects for the December front page eye candy, so check out what we've all been working on! And don't forget, the holiday printables countdown is still going on through Dec. 25!

If I don't manage to get another post written before 2010, have a safe & creative holiday season and a Happy New Year!

Saturday, December 5, 2009

Charm auction benefiting A Place To Bark

I've mentioned before that I participated in a charm swap for the Raevn's Nest Art Retreat back in October. One of the participants did not show up, so Kim Rae Nugent is auctioning off the extra charms on eBay to benefit A Place To Bark, the animal rescue organization run by fellow artist Bernie Berlin.

This lot includes charms made by Laurie Mika, Jill K. Berry and Kim, of course. Mine's not in the auction photo, but I just mailed Kim one of my extra charms to include. (I wasn't there the night of the swap and had traded with the participants individually the next day.)

Monday, November 30, 2009

Ten Two Studios Christmas Countdown

Can you believe the year's gone by so fast? Starting tomorrow, Lisa Vollrath's doing her annual Countdown to Christmas. That's a new printable sheet you can download every day through Dec. 25. All she asks is that you put a link to the countdown on your blog or website.

Also check out the Ten Two Studios front page for daily eye candy from members of the design team! Here's one of the things I've been experimenting with - Tunnel ATCs using the Festive Elements sheet.
Holiday Tunnel ATCs

Thursday, November 26, 2009

What I'm Baking

Happy Thanksgiving! So where did November go? Beats the heck out of me! I thought I'd share the recipes for the two desserts I made this week:

Wisconsin Whoppers

These are giant oatmeal-peanut butter-chocolate chip-cranberry cookies.

2/3 cup (1-1/3 sticks) unsalted butter, room temperature
1-1/4 cups packed light brown sugar (I usually reduce this to 1 cup)
3/4 cup white (granulated) sugar
3 large eggs
1/2 teaspoon vanilla extract
1-1/2 cups peanut butter
6 cups old-fashioned rolled oats
2 teaspoons baking soda
1-1/2 cups dried cranberries (6 oz. package of Craisins)
about 1 cup semisweet chocolate chips (I don't really measure this!)

Preheat oven to 350 degrees F.

With mixer, cream butter in a large bowl until light-colored, about 1 minute. Gradually beat in sugars then scrape down sides of bowl. Cream until light and fluffy, about 3 minutes. (OK, I really don't beat it quite as long as the recipe says because I'm impatient.)

Beat in eggs, one at a time; beat 1 minute more after final addition. Add vanilla extract and peanut butter and beat until blended, 1 minute. Add oats and baking soda, beating only until blended, about 30 seconds. If you don't have a heavy duty Kitchen Aid and are just using a wimpy handmixer like I do, switch to a sturdy spoon after adding the oats and stir until the oats have all been coated with peanut butter.

Stir cranberries and chocolate chips into creamed mixture until evenly distributed.

For "whopper" size cookies, use 1/4 cup measure to spoon out dough onto cookie sheets. Flatten cookies to 3-inches in diameter with bottom of a glass tumbler that is dipped frequently in water. (Or just use your hands!) Or just spoon out whatever size cookies you usually make. Space cookies about 2 inches apart.

Bake 15 minutes or until lightly browned. Let cool about five minutes on baking sheet before moving to wire rack. (They are very crumbly when they first come out of the oven.)

Makes 2 to 4 dozen depending on size.

Original source: Milwaukee Journal Sentinel (A copy of their version, which is slightly different, can be found here) Did you know that Wisconsin is the top cranberry-producing state?
----------------------------------------------------
Zesty Orange Pumpkin Tart
Easy peasy pumpkin pie! (Another recipe from the Journal-Sentinel)

You'll need a ready-made unbaked pie crust for a one-crust pie in a 9 or 10" pie pan (unless you're one of those masochists who likes to make your own pastry ;o)
Pie Filling:
1 can (16 oz.) solid-pack pumpkin (not the already seasoned pie filling)
1 can (12 oz.) evaporated milk
1/2 cup white sugar
1/3 cup orange marmalade
2 eggs
1 teaspoon pumpkin pie spice (see note below)
1/2 teaspoon salt

Preheat oven to 425 degrees F.

In a large mixing bowl combine all the filling ingredients and blend until smooth. (Orange peel in the marmalade will cling to your mixer blades! :o) Pour into your pie-crust lined pan. Bake for 40 to 50 minutes or until a knife inserted in the center of the filling comes out clean. Let cool before serving. Serve with REAL whipped cream. None of that non-dairy whipped topping stuff!

Notes:
If you don't have 1 tsp. pumpkin pie spice on hand, you can substitute 1/2 tsp. ground cinnamon, 1/4 tsp. ground ginger, 1/4 tsp. ground allspice, 1/8 tsp. ground nutmeg.

I recommend using a pie crust shield to protect the edges of your crust from burning. I usually put it on about 15 minutes into baking. Otherwise you can use strips of aluminum foil, which are a BIG pain!

Have a great holiday weekend!

Saturday, October 31, 2009

Hinged Copper Locket Workshop

Happy Halloween! We just survived our first Halloween in our new neighborhood where we had about 200 trick-or-treaters come to our door (compared to less than 20 at our old place). We ran out of candy, and the last two kids got granola bars! (Peanut butter chocolate chip granola bars, so they're almost candy ;o)

So here's the final installment from Raevn's Nest Art Retreat. Last Saturday, I took an all-day workshop with Richard Salley, learning how to make this copper locket. (If you click on the tutorial sidebar on his website, you'll find a very similar project.)

I don't have a lot of experience in working with metal and wire beyond making a few charms, reading a bunch of books and watching Jewelry Making on the DIY network, so I was excited to learn some basic things, like using a jewelry saw (broke 3 blades cutting that heart shape out of the rusty washer that forms the image frame), making rivets and staples, and shaping copper and then aging it in liver of sulphur. My wire work still needs a lot of practice (those S- and C- scrolls are supposed to be symmetrical), but I learned a lot from the class and went home excited to make more! Now I just need to find the time....

You can click on my images to see a larger view on Flickr. And check out what other folks made:
Kathi took Richard's two workshops on Friday. Fabulous!
Carmi was in the same class as me - I love her take on this project!
Jill sat in front of me, and I was in awe of her skill. She also reassured me that it was normal to break saw blades. (Scroll down to see her work from the Friday & Saturday Salley workshops)

Thursday, October 29, 2009

Making a (Watchmaker Tin) Scene

Here's the second installment of my Raevn's Nest Art Retreat experience. On Friday night I took the "Make A Scene" workshop with Jill K. Berry, where we spent two crafty hours constructing mini-dioramas in watchmaker tins. Jill provided all the materials including images sized to fit the little metal tins. The garden scene above is about 2-3/4" while the haunted mansion below is 2" in diameter.

We staggered the layers with hidden beads, head pins trimmed to size, and the power of a high-heat glue gun! It was a little tricky getting everything into place before the glue cooled, but the results are so much fun! The tins do have clear glass lids, but they didn't photograph well with the lids on.
Hitchcockian Tin
You can see some of Jill's samples on her blog. My friend Mel also took this workshop and made a great George of the Jungle tin, which I hope she'll post a photo of! :D

Tuesday, October 27, 2009

Making 3-D ATCs

Imagine
I'll be blogging my Raevn's Nest Art Retreat experience in installments. Last Friday, I took the "3-D ATC" workshop taught by Laurie Mika. I've never used polymer clay before (having vowed I was not going to take up any more crafts that involved buying even more supplies), and I was surprised how simple Laurie's technique is.
Journey
We rolled out Sculpey III or Premo by hand, stamped it with rubber stamps to create texture and then embellished with acrylic paints, mica powders and doodads, cutting and stacking shapes to make these three-dimensional ATC-sized works of art. My layers were only about 1/8" thick with my thickest ATC being about 3/4" but some of folks in my class made pieces over an inch thick! These were all baked at 275F for about 20-25 minutes or thereabouts. The temperature is low enough that we could include paper images in our pieces, so I used a Rossetti faux postage stamp and some tiny Victorian faces from Ten Two Studios. Laurie provided all these fabulous rubber stamps with words and textures for us to use. And no, these are not available for trade! :D
Treasure
Here are some other folks who took the class and posted pix of what they made:
Carmi Cimicata
Gary Warren Niebuhr

Saturday, October 17, 2009

Halloween & Day of the Dead projects

Dearly Departed (spread 1 - cover)
No, I haven't fallen off the face of the earth! My non-art job has been incredibly busy, and then I got the cold that's going around, so I'm moving in slow-motion. But here's what I've been working on. Above is Dearly Departed completed for the Ten Two Studios design team challenge, which I had mentioned last month. I used a paper bag book and colorful Day of the Dead designs from Ten Two Studios. You can see all the pages in my Dearly Departed Flickr set. The book will also be on display at the Bay View Book Arts Gallery later this month for the 2nd Annual "Darkness Falls" show.
Dearly Departed (spread 4)
If you haven't been over to Ten Two Studios lately, Lisa's been posting daily Halloween eye candy from the design team and others. Kooky & creepy - Be sure to scroll down to see everything!
Halloween domino charms side A
Next weekend, I'm attending Raevn's Nest Art Retreat in Cedarburg, WI. I registered for this back in March, and I can't believe it's almost time! I'm still running around trying to get my class supplies. I signed up for three workshops: 3-D ATCs with Laurie Mika, Make A Scene with Jill K. Berry, and Hinged Copper Locket with Richard Salley. (There are photos of the class projects at the bottom of each workshop page.) I'm also participating in a Halloween-themed charm swap at the retreat, and so I've been working on those (using dominoes and images from Ten Two Studios, of course). This is the reverse side of the charms above:
Halloween domino charms side B
I'm also working on ATCs for the Milwaukee ATC group's next meeting, which happens to be on October 31, so not surprisingly the Halloween & Day of the Dead theme won the vote. I've been doing a series of Witchy Women, with these fun collage sheets
Double, Double, Toil & TroubleFire Burn and Cauldron Bubble
You can see the rest of the set on Flickr. So that's what's going on here!

Wednesday, September 23, 2009

Holy Hill Arts & Crafts Fair

I had planned to post this report last Sunday but our internet was out for a chunk of the day (horrors!). Last Saturday I attended the big Arts & Crafts Fair at Holy Hill for the first time. Fellow Ten Two Studios design team member Patti had a booth in the show, so I had to go check it out!

I met up with artsy friends Kathi and Ellie to brave the crowds. There were over 200 exhibitors, and we managed to walk BY every booth at least (we think). It was wonderful to meet Patti in person. I met her and her husband Mark for dinner on Friday night, and we had fun gabbing about art & life. On Sat. we stopped by her booth several times in our travels and happened to arrive just as she received a ribbon from the show organizers!
IMG_8218x Patti wins a ribbon!Sentry By Patti Monroe-Mohrenweiser
Patti does amazing things with repurposed materials. I bought this shadow box "Sentry" made with weathered wood from her kids' old playhouse and an encaustic collage featuring one of her photographs.

My other purchases were this pendant made from a silver fork by Dianne Pecor (who coincidentally is a relative of Kathi's) and this fun paper mache Halloween cat bobble head by Monnie & Patrick Wilson of Manitowoc, WI.
Fork Pendant By Dianne PecorHalloween Cat By The Wilsons
I also bought something from Dianne that I can't yet reveal since it's a birthday/Christmas present for my brother and his wife, but it involves silverware, a cat & fishes and makes noise. Ellie bought a bat-shaped garden ornament from Shari Grenzow Mauer.
IMG_8216x Ellie & Kathi
We also took scenic photos :D This was my first time visiting Holy Hill, but after all that arts & crafts walking I didn't have any energy left to climb the 178 steps to the tower for the full panoramic view. We took the elevator up to the basilica and then walked back down the hill afterwards. More photos in my Flickr set.
IMG_8220 Basilica of Holy HillIMG_8239 Holy Hill

Monday, September 21, 2009

I'm in a Day of the Dead Etsy Treasury!

Big thank you to MonkeyTree Creations for choosing my little art quilt Gossip for her treasury Flores and Calaveras. Check out all the cool stuff she found! And be sure to visit her store and blog. Adorable stuffies!
Gossip

Wednesday, September 16, 2009

Exuberant color or just really garish?

I've been so busy with non-artsy work lately that it's all I can do to write a blog post once a week! But I have been trying to get a little bit of art done every day. Right now I'm working on another Ten Two Studios design team challenge. This time I have a waterfall paper bag book and some of the new eye-wateringly colorful Day of the Dead sheets.

I LOVE 'EM! The bright color combinations inspired my backgrounds. I gessoed the paper bags pages & inserts so the lighter acrylic paints would show up more vividly and then added designs in contrasting colors with foam stamps. I don't think I've ever used orange, turquoise and lime green together before this! So far I've got the main imagery and the text laid down. Now it will probably sit for awhile until I decide what to do next!
IMG_8211x Work in Progress

Wednesday, September 9, 2009

How did you make that?


Annie, aka EraserQueen in the ATC & mail art world, posted a YouTube video showing her working on a collage (accompanied by fun music!) and challenged viewers to do similar demos. Alas, I'm unable to do that because my process isn't so straight forward. Take these ATCs I made for the Milwaukee ATC group's September live trade, which has the theme "Storytelling":
Once Upon A Time #7-12
My creative process went something like this:
1) Start cutting out interesting images from Smithsonian and National Geographic Traveler magazines. I knew I wanted fairy-tale setting backgrounds and people in costumes, but other things caught my eye too.
2) Glue backgrounds to poker cards (because they're ATC size :o) with a glue stick and start arranging my "characters"
3) Make a bunch of these magazine collages and then let them sit gathering cat hair for several days while I figure out what's missing.
4) Decide to brush a thin layer of gesso over the images, leaving the faces exposed and the rest of the image still visible.
5) After the gesso dries overnight, recolor the images with Permapaque markers (because they have a slightly slower drying time, allowing me to rub and blend color with my fingers).
6) Leave these sitting on the dining room table for a day or two while I figure out what's missing.
7) Stamp white curlicues and text "Once Upon a Time" on the cards.
8) Realize that the magazine paper is still just glossy enough that the pigment ink won't set properly so I experiment with a heat gun, which makes the magazine paper that was only attached by glue stick warp a bit in places (or maybe it was the plastic coating on the playing cards melting :o).
9) Decide embossing powder will do the trick! (Experiment to see whether silver embossing powder will work - decide it overpowers the card and switch to clear powder)
10) Flatten all the cards by sticking them under heavy books protected by wax paper.

Honestly if I'd been trying to film all that at the same time, the cards would never have been finished! :D But I hope you will take up Annie's video challenge!
Once Upon A Time #1-6

Thursday, September 3, 2009

Victorian Characters in Search of a Novel

This week, Lisa posted my book "Characters in Search of a Novel" at Ten Two Studios. This was made for a design team challenge to use manila envelopes and tabbed pages, and I wanted to incorporate the Color Me Victorians collage set.

Each manila envelope is attached to a tabbed page and contains a character bookmark. I had fun assigning themes and archetypes. Some text was from the collage set; some I printed from my computer or wrote on the tabs: Romance & Revolution, Hero & Villain - all those archetypes.
Victorian Characters in Search of a Novel #2
The best part, of course, was coloring all the Victorian sketches! Literary child's play?
Victorian Characters in Search of a Novel #3
The background text on the bookmark tags was from an old copy of Silas Marner.
Victorian Characters - Destiny TagVictorian Characters - Nemesis Tag
All the fun of English literature without having to write a meaningful essay about it!

Sunday, August 30, 2009

Post-fabric painting housekeeping

I love fabric painting, but alas the day comes when I have to do the boring "housekeeping" stuff. If it hadn't been raining on Thursday, I would have probably said "To heck with this" and painted some more fabric instead! But instead I was a good girl and hand-washed all the fabric I painted this month to remove any salt and leaf bits and excess paint. Then I ironed everything on the pretense that this will heat set it. (I say "pretense" because I don't think I actually hold the iron long enough in place to really do the job, but in the long run, time sets these Setacolor paints, so at least I have less wrinkly fabric.)
IMG_8184 Heat setting with an iron
Some tips on ironing painted fabric:
Don't use your good iron, because you will probably get paint on it. I have an iron reserved for craft use (fusible webbing, image transfers, etc). I also covered my ironing pad with blank newsprint so I didn't fuse paint to that either.
Here's how my iron looked after taking on some red fabrics. You can buy a tube of iron-cleaning goop in the sewing notions section of the store, but I recently learned a tip from Sharon in my book arts group. Save all your used dryer sheets, and after all the fabric softener stuff has been shaken out in the dryer, you can iron them to scour gunk off your iron. You may still need to do a heavy duty cleaning later on, but this is a fast and easy way to clean and keep ironing. (And then you can save those freshly flattened & paint-stained dryer sheets for art projects!)
IMG_8189 Hung out to dry
I'm not a very enthusiastic ironer (is that a word?), so my fabric was still slightly damp when I decided I was finished, and I hung it on a drying rack. So that's all done, phew! And now I have some new fabric to play with!

Belatedly blogged for Fiber Arts Fridays

Friday, August 21, 2009

Sunprinting on Fabric

After last week's blog post about fabric painting, I managed to do a little sunprinting on Saturday. "Sun printing" is a bit of a misnomer because apparently it's not the light but the heat that causes the effect. The faster the paint dries, the brighter or darker the color sets. The paint underneath the objects (leaves, washers, doilies, etc) dries slower so the color is faded.
IMG_7996 Second coat of paintIMG_7997  Laying out leaves for sun-printing
I took the fabric I had salt-printed (if that's a term) on Friday, which was still stretched on a frame, and painted over the whole thing in purple. Then I laid out leaves that I had pressed in a phone book and put the whole thing outside to dry.
IMG_8001 Is it done yet?
Impatient? Who, me? The fabric was nearly dry when I lifted this leaf to see how things were going. And here's the final result:
IMG_8002  Peeling off the leaves
Here's a Setacolor Soleil sun-printing tutorial at the Michaels website, though as I mentioned last week, the Michaels stores near us put all their Pebeo Setacolor fabric paints on clearance earlier this summer and don't carry it anymore. I mix my fabric paint 1:1 with distilled water.

Here's a tutorial from Simply Quilts about the salt technique. This was from an episode featuring Indiana quilt artist Phil Beaver who does some amazing applique with his hand-painted fabric.

Blogged for Fiber Arts Fridays

Friday, August 14, 2009

Fun with fabric paint


I've been wanting to get some fabric painting done this summer, but weather and time never seemed to coincide. On Wednesday afternoon, I looked at the bright sun shining on our back deck, and decided I would put off all the other stuff I had to do. Of course by the time I dragged out all my supplies and mixed my paint a huge cloud covered the sun! Sigh....
I like to use the Pebeo Setacolor (transparent color) fabric paints, which work well for sun-printing. (Our Michaels store used to carry them, but it all went on clearance earlier this summer, which at least let me restock my supplies.) You can see some examples of sun-prints in my Fabric Painting set on Flickr. On Wednesday, it became too cloudy and humid to get a good sun-print effect, so I focused instead on jazzing up some boring fabric. The unpainted fabric visible next to the paints above was a white-printed beige cotton fat quarter. The white design somehow acts as resist, and when you paint over it in a bright color like red, the pattern just pops!
IMG_7988_9
I also experimented with some fabric scraps from a friend who makes vintage-style clothing. This pale green fabric needed some stronger color, and it was fun to discover that the floral pattern on it also stood out when painted a brighter green.
IMG_7991_2
I also salted one fat quarter on a stretcher frame. Add rock salt while the paint's still wet (left) and then as it dries the salt sucks the color into flame-like organic swirly patterns (right). Here are a bunch of experiments laid out to dry in the back yard:
IMG_7990x
Now when's my next free sunny day???

Blogged for Fiber Arts Friday
Related Posts Plugin for WordPress, Blogger...