Sunday, December 12, 2010

Outdoor Cat After One Year Indoors

This time last year we brought Outdoor Cat indoors for the winter in advance of a snow storm. (She had spent who knows how many previous winters living outside, which in Wisconsin is pretty cold going. You can see all the related posts here.)

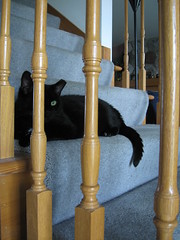
Once she figured out that she could stay inside, she pretty much became an indoor cat (though we still call her "Outdoor Cat"). Occasionally she will ask to go out, and we'll open the front door for her. She sit on the porch and look around, nibble some grass, and maybe explore the bushes, but about 5-10 minutes later she's at the door waiting to be let back in. Like all cats, she is trying to train us humans. As this video shows, her hardest task is getting us to follow her to her empty food dish (and she will put up with annoying baby talk to get what she wants).

Now that cold weather has set in, I sometimes wake up in the wee hours to find I'm wedged in between my husband on one side, Outdoor Cat on the other, and Nuts the 16-lb. cat crushing my feet. Sometimes all three of them are snoring. (The third cat Ruby prefers the living room couch.)

As I type this, we're under a winter storm warning. Outside, the wind is howling, the snow is gusting, and the windchill is 6°F (-15°C). Outdoor Cat is sleeping in front of the heat grate on my office floor (amidst the piles of papers seen in the video - I'm still cleaning!) And when I get up from my chair, she will probably run straight to her food dish in the next room and look at me expectantly!

Thursday, November 25, 2010

Easy Pumpkin Bar Recipe

Here's an easy recipe if you have an extra can of pumpkin sitting around. I posted recipes last Thanksgiving, so maybe this will become an annual tradition. This recipe actually came in a flyer from a local bank, so not all junk mail is bad!

Ingredients
2 cups all-purpose flour
1-1/2 cups packed brown sugar (I used slightly less, I admit)
2 teaspoons baking powder
1 teaspoon baking soda
2 teaspoons pumpkin pie spice*
 1/4 teaspoon salt
1/2 cup vegetable oil
1/2 cup apple juice (I didn't have any, so I substituted apricot nectar - hey, it was in my pantry!)
1 can (15 oz.) pumpkin (not the pre-seasoned pumpkin pie mix)
2 eggs

*NOTE: If you don't have 2 tsp. pumpkin pie spice, you can substitute 1 tsp. cinnamon, 1/2 tsp. ginger, 1/4 tsp. nutmeg, 1/4 tsp. cloves.

Directions:
Heat oven to 350°F. Grease & flour a 15x10x1-inch pan. (As you can see from the photo below, I didn't have that size pan, so I improvised.)

In a large bowl, beat all the ingredients together with an electric mixer until combined. (The original recipe said "on low speed until moistened. Beat 2 minutes on medium speed," but who has the patience for that?) Spread batter in pan.

Bake 20-30 minutes or until toothpick inserted in center comes out clean. Cool completely (about 1 hour). I admit that I didn't wait that long before tasting.
IMG_1820 Pumpkin Bar
Finishing touches - The original recipe suggested using a 16-oz. container of ready-made cream cheese frosting to be applied after the pumpkin bar has cooled for an hour. Then it said you should refrigerate the whole thing for another 30 minutes "until set." Honestly, who can wait for that!? Assuming you have leftovers, you should store them in the fridge.

I'm not a big frosting fan, and I found it fine without topping. I did briefly consider spreading pecan pumpkin butter on it, but decided that was overkill! Happy Thanksgiving!
Pumpkin Overdose - November 22, 2010

Sunday, November 7, 2010

Help support arts education in Fond du Lac


Even if you don't live in Fond du Lac or even Wisconsin, please take a moment to vote for the proposal my friend Mel's group Fond du Lac Visual Arts has submitted to the Pepsi Refresh contest. They are in the running for $25,000 but they need to get into the top 10 entries to win. You can vote every day through November 30, 2010. When you click on the "vote" button, you will be asked to register with your e-mail address and create a password.

You can read Mel's blog post about it here.
Please vote daily!

Thursday, October 28, 2010

Books Unbound - Milwaukee book arts show opens Halloween

It Was A Dark & Stormy Night
As I mentioned in my previous post, the Binders Guild is having its first show, "Books Unbound." The opening reception is this Sunday, October 31, 2010, from 2-4 p.m. at the Marian Gallery, Caroline Hall, Mount Mary College. The show is up through November 27, 2010 and gallery hours are Monday -Friday, 9 a.m.-7 p.m. and weekends 1-4 p.m.
Dearly Departed
The best thing about a book arts show? You're allowed to handle some of the books! Given the opening date, there are a few Halloween-themed pieces, of course, but we have a wide range of book art from ten artists. You can see the Flickr set of my submissions here. (I don't know that they will all make it in to the show because of space limitations.)
2009_365_119 Envelope Epergne Altered Book

Tuesday, October 12, 2010

Two Book Arts Exhibits in Milwaukee!

The Binders Guild, of which I am a member, is presenting its first show "Books Unbound" from October 31-November 27, 2010 at the Marian Gallery, Caroline Hall, Mount Mary College in Milwaukee, Wisconsin. The opening reception is on Sunday, October 31, 2010 from 1-4 p.m. and the gallery's regular hours are Monday-Friday 9 a.m. - 7 p.m. and Saturday-Sunday 1-4 p.m. There will be an interesting mix of book arts and more from 10 artists. Please stop by and check it out if you're in the area.
Once Upon A Time

And up now through December 17, 2010 in the Fourth Floor Exhibition Gallery of the UW-Milwaukee Library is 2x2: Small Book Works, featuring 2-inch square books by members of the Milwaukee Book Arts Salon and the Bone Folders Guild of Madison (some of whom are also members of the Binders Guild or friends of mine through other local art groups).

Sunday, September 19, 2010

Photowalking with Cream City Flickrites

Yesterday I went on a photowalk with the Cream City::Milwaukee Flickr group, my first one since March 2009. They meet on the 3rd Saturday of the month, which is often the same day as the Milwaukee ATC group's monthly meeting, so schedule conflicts and inclement weather usually keep me from attending. I usually feel self-conscious walking around taking photos of things, but on a photowalk is I'm part of a big group of people all taking photos of everything. Safety in numbers!
IMG_1120xIMG_1121x Mail Box
Photowalks also force me to take a closer look at my environment and notice details. The fun part is seeing what everyone else took photos of, and I find that drives me to become a better photographer as well, even with my rinky dink digital camera. Plus, I see parts of Milwaukee I usually only drive past. This walk started at the Milwaukee Ale House and ended at the Wicked Hop, so my husband was happy to come along, too! He asked me to take photos of textures he could use in computer graphics, and I also took reference photos for my own art.
IMG_1116IMG_1078
We came across the sculpture Stratiformis by Jin Soo Kim, which I had read about but never seen. She incorporated 19th century knitting machines once used in a factory in the neighborhood.
IMG_1147x Stratiformis
At one point, we walked past an alley and saw a pack of photographers clustered at one end, cameras all pointed at something behind the building. My husband said, jokingly, "They must have found a dead body." Well, dead auto bodies!
IMG_1135x
So if you have the opportunity to do a group photowalk, I highly recommend it! You can see my photowalk set here along with photos from previous walks.

Tuesday, September 14, 2010

Fabric Paper Collage ATCs

Yes, I gave into the craze for making fabric paper! I first read about it back in 2004 in Beryl Taylor's article "Making Fabric from Paper" in the premiere issue of Cloth Paper Scissors and in her luscious book Mixed Media Explorations. There's a basic how-to on the Quilting Arts website. You start with a layer of muslin fabric and glue paper to that base and then paint, stencil, spritz & stamp layers of color on top of that, and then cut it up to use in collage that can be stitched! (The photos above right top to bottom show some of my layers of paper & color being added.)

I had experimented with the technique a little, making this mini art quilt in 2007, but never really embraced it. Then my friend Darlene did a demo for our local ATC group this past April and encouraged everyone else to try it. And my friend Sue gave me a copy of Kelli Perkins' book Stitch Alchemy, which featured colorful Day of the Dead fabric paper greeting cards.

So I decided to try the technique for my ATCs for the Day of the Dead swap at Illustrated ATCs. I made two pieces of fabric cloth about 11x18" each (or half a fat quarter) - one in red/pink/orange shades (see above) and one blue/green/yellow.
More Fabric Paper - September 8, 2010
Then I cut out my shapes and tacked them down with a bit of glue to hold everything in place until I could stitch it.
Muertos ATCs - September 10, 2010
For the borders, I used some colorful fibers handspun by my friend Kathi. Here are the four that I'm sending in for the swap:
2010 Day Of The Dead #12010 Day Of The Dead #2
2010 Day Of The Dead #32010 Day Of The Dead #4
Now I have to finish some fruit ATCs for the Milwaukee ATC group's September theme "Eat, Drink & Make Art." (You can see some of them under construction in the first photo above.)

Saturday, September 4, 2010

Got Tomatoes? - A Summer Recipe

Tomatoes - August 23, 2010
This summer I actually have ripe tomatoes! In the past (when I've bothered to plant anything), I tend to start too late in the growing season, which in Wisconsin is pretty short anyway, and I end up salvaging green tomatoes off the vine when the first freeze comes. This year I actually had to worry about using up my tomatoes before they got TOO ripe!

So I tried the recipe for Bread and Tomato Salad from the Sundays At Moosewood cookbook.
Ingredients - September 2, 2010
INGREDIENTS:
2 cups dried bread cubes (about 1/2" cubes)
2 garlic cloves minced
3 tablespoons olive oil
2 cups chopped tomatoes
1 tablespoon chopped fresh basil
1 tablespoon lemon juice
salt & pepper to taste

In a large skillet, saute bread cubes and garlic in olive oil until garlic starts to color and bread has absorbed most of the olive oil. Put the bread in a large dish and add remaining ingredients and mix. The bread does get pretty soggy, and toasting helped somewhat before sauteing. (I admit to eating this with my fingers ;o)
Bread & Tomato Salad - August 28, 2010
Be sure to check the comments on this post for more tomato recipes! :D

Sunday, August 15, 2010

ATC Fun with Puffy Paint

I'm not sure where August went, but it's been some two months since my last post! Life has been busy, and if you're ever wondering what I'm up to you can always check out my Flickr account, which gets an update at least once a week. Last month I was experimenting with Tulip brand Puffy fabric paint.

Here are some ATCs I've made for the Milwaukee Artist Trading Card group's July theme Life's A Beach:
Bathing Beauties #4-6
You can see the full set here. The foamy wave texture was made with white Puffy paint swirled with my finger over the collaged images (Bathing Beauties faux postage from Ten Two Studios). I let the puffy paint dry over night and then hit it with an heat gun so the swirls puffed up to make the cool texture. Then I painted the swirls with several washes of blue & green acrylic paints. (The puffed paint acts like a sponge sucking up the color.) The embellishments are hand-spun yarn from my friend Kathi and vintage shell buttons.

Using the same technique for a completely different look, I made another set of ATCs inspired by the opening credits of the HBO series Treme, which includes vintage photos of New Orleans and family photos damaged by water and mold.
Lost Memories #1-3
You can see the full set here. This time I created the organic root-like texture by pressing two surfaces wet with white puffy paint together and pulling them apart again. I used the heat gun while the puffy paint was still wet, and it bubbled up more, making weird mold-like growth. And I used darker colors - purple, brown & green. The images are from Ten Two Studios' Octavia and Storyville collage sheets.

Pretty funky!

Sunday, June 13, 2010

What My Friends Are Blogging

You may have noticed that sidebar to the right with a list of other sites to visit when you get bored with my blog. I'd like to highlight two friends who've made the blogosphere plunge in the past year:

I've known Wendy Shang since we lived in neighboring dorm suites our first year of college. (I won't say how long ago ;o) Her first novel The Great Wall Of Lucy Wu is being published next year by Scholastic! She's blogging about the writing life at Skytale and is also a contributor to From the Mixed-Up Files of Middle-Grade Authors, a new blog that's starting off with a blast this month by giving away nine books!

I first met Mel Kolstad on-line through the old ATCards site (now ATCs For All), but I now count her as a "real life" friend :D since we also get to meet every month in person to trade ATCs with the Milwaukee Artist Trading Card group. Mel recently made the big plunge of becoming a full-time artist! Her first blog Much Ado About Stuff now has its own spin-off blog Ephemeraology focusing on her love of vintage stuff.

So go check 'em out!

Tuesday, June 8, 2010

Joseph Cornell Is For The Birds!

The Milwaukee ATC group's June theme is "For the Birds," which solidly trounced "Favorite Artists," the theme I voted for, so I combined the two and made these Artist Trading Cards inspired by Joseph Cornell's Aviary series. The parrots in the first ATC above are the same ones Cornell used in The Caliph of Bagdad and Untitled (Parrot and Butterfly Habitat). You can see these and other Cornell parrot boxes grouped together in this great post at the Kiwi's Angels parrot blog.
For my ATCs I started out with Patti's Parrots Faux Postage from Ten Two Studios and some vintage text glued to some serendipity collage backgrounds. Then I gessoed around the parrots to blend everything together and create the weathered white painted surface that Cornell had in his Aviary boxes. Then I added punchinella (sequin waste) to suggest bits of cage wire. The round things are the plastic labels removed from tabulating machines (a craft supply shared with our ATC group by one of our many generous members), and I also had some old air mail stickers.
To suggest a three-dimensional shadow box, I painted 19th-century newspaper text to look like wood and cut it into strips to outline the card. Then I added shadows around the corners of the box and behind the "props" with a wash of acrylic paints. Definitely need to make some more of these! :D

Sunday, May 23, 2010

Outdoor Cat Update

Outdoor Cat - May 20, 2010This past week was the one-year anniversary of Outdoor Cat going through the Wisconsin Humane Society's Trap-Neuter-Return program. I last reported in December that she had moved inside for the winter, and now that spring is here, she still prefers to stay inside. She'll still ask us to open the front door, but then she'll usually only stay around the front porch for awhile, eating some grass and watching the world. As soon as the neighbors come out, she runs back inside.

It's interesting how many typical indoor cat habits she now has, such as scratching at the bathroom door if it's closed and sleeping next to my chair in my office. Occasionally if I don't get up at 6 a.m., I'll find her sitting on the bed beside me, staring very earnestly at me. We no longer close her in a separate room when we go out, and for the most part the three cats tolerate each other, though there's always the occasional hissing match when they cross paths. At 6:10 this morning I had both Nuts & Outdoor Cat walking over me, within a foot of each other without hissing because they were both intent on getting me out of bed to feed them. And BOTH had food in their dish but wanted me to pet them and move the food around for them before they would eat. (Naturally my husband slept through this ;o)

Next step will be moving OC's litter box down into the basement with the others so I can reclaim the guest/sewing room!

Thursday, May 13, 2010

Do You Zentangle?

Zentangling - February 17, 2010
I admit, I tried to avoid the Zentangle craze, but then I saw Sandy Bartholomew's article in Cloth Paper Scissors, and then checked out the Tangle of the Week on her blog. Next thing I know, I'm making Zentangle ATCs, though I wasn't able to keep to just black & white!
Berry ZentanglePeas N Stripes Zentangle
Another great source for design ideas is Molossus' blog Life Imitates Doodles, which provided inspiration for the Gem card below left:
Gem ZentangleShiny Zentangle
The one on the right above was embossed metal, and I'll definitely have to try some on the sewing machine since there's a strong doodling link between the tangle patterns and the free-motion stitching I learned from Diane Gaudynski. In the meantime, it's ink pens & Twinkling H20 watercolors for me!
In The CloverCocoon Zentangle

Thursday, May 6, 2010

A Picture A Day

While I haven't had much time for blogging, I'm still doing my 365 photo project, taking a photo a day (some days are better than others - there are a lot of photos taken at night with bad lighting)

I also submitted a photo for the New York Times "Moment in Time" event, where they asked people to take one photo at the same time around the world on May 2, 2010. They apparently only expected to get a few thousand but ended up with over 13,000 submissions (and counting). I photographed some Artist Trading Cards in progress on the dining room table.
Moment in Time - May 2, 2010, 10 a.m. CST
You can see other photos on the NYT Lens blog and in this spontaneous unofficial Flickr group. Eventually the NYT plans to have a gallery up and running where you can see all the photos submitted! Just give them a bit more time.
UPDATE: You can see all the photos they received here. Alas, because I had trouble with their submission form on the day, mine was one of the ones lost in the e-mail submissions.

Tuesday, April 27, 2010

Simple Sweet Scones

Scones - April 25, 2010
Long ago in the days before the internet (the 1980s), I was struggling with a scone recipe from British Heritage magazine (I think the measurements were by weight rather than volume), and my college housemates took pity on me and bought me Biscuits and Scones by Elizabeth Alston.

Twenty years later, the spine of the book has cracked so that it will usually just flop open to the recipe for Simple Sweet Scones.

2-1/2 cups all-purpose flour
1 tablespoon baking powder
1/2 teaspoon salt
8 tablespoons (1 stick) unsalted butter, cut up
1/4 cup granulated sugar (or 1/3 cup for sweeter scones)
2/3 cup milk

Preheat oven to 425F. Mix flour, baking powder and salt together in a large bowl. Add the butter and cut in with a pastry blender or rub it in with your fingers until the mixture looks like fine granules. (I prefer the finger method.) Add sugar; toss to mix (with your hands - not tossing it up into the air ;o).

Add milk and stir with a fork until a soft dough forms. Form the dough into a ball, and knead gently on a lightly floured board (about 10-12 kneads). Pat or roll the dough out into a circle about 1" thick and cut out scones with a biscuit cutter or round drinking glass dipped in flour.

Place scones on an ungreased cookie sheet, and bake for about 12 minutes or until medium brown on top. Put a linen or cotton dish towel on a wire rack and lay scones out to cool, covering them loosely with the cloth. Serve with butter & jam (or whipped cream or clotted cream if you're feeling decadent), and a nice cuppa tea.

Sunday, April 11, 2010

Paint Fabric While the Sun Shines

We had a sunny 62°F day here, so I ignored the housekeeping and yard work and pulled out the fabric paints for the first time this year.  I used some cotton pieces that I had previously painted but didn't really like plus two 12x12 plastic stencils from Crafters Workshop that I bought at Legacy Scrapbooks in Cedarburg last year. First I experimented with some Tulip fabric spray paint.  It's a pump spray rather than an aerosol so the effect can be splotchy, but it turned out pretty groovy with the "Flower Frenzy" stencil (shown above).

I had originally bought the stencils to use for sunprinting, so I tried that as well. I painted a layer of contrasting color (Pebeo Setacolor) over the previously painted fabric, and then placed the two plastic stencils, using thumbtacks to keep everything in place on this very windy afternoon. In the photo below, the Flower Frenzy and Cosmic Swirl stencils are visible at the top, and a piece I sunprinted earlier with Cosmic Swirl is at the bottom.
Sunprint With Stencils
So here's what I made today - the top two are sunprinted, and the bottom pieces were spray-painted.
Sun Print & Stencil Results
Related Posts Plugin for WordPress, Blogger...